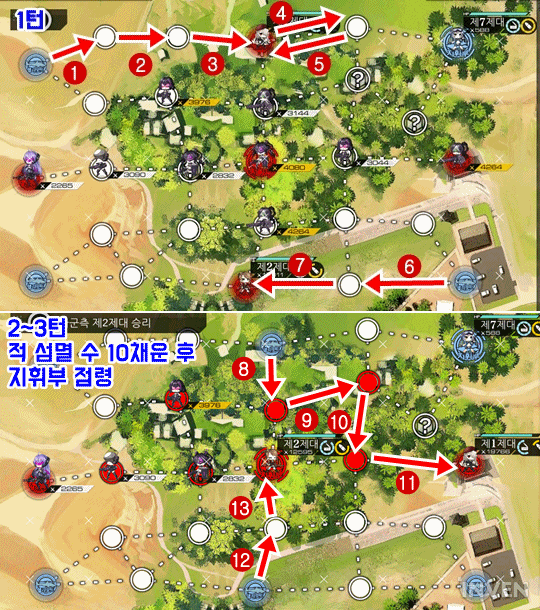
It is important to be flexible in mission due to Girls Frontline does not have fixed enemy movements. So adopt accordingly.I am using pictures with Korean language on them, anything on it will be translated on the bottom of the picture. Red numbers indicates movements. Number on top left of the picture indicated what turn it is in.
I would like to thank Redin at Inven.co.kr with the image. Without it I would have to spend hours capturing new images.
-
5-1
S-Rank condition: Kill 11 unit in 4 turns; control enemy HQ.
Required Squads: 2 (+8,000 & +7,500 recommended) + 1 Friend Echelon
-
5-2
S-Rank condition: Kill 7 unit in 3 turns; control enemy HQ.
Required Squads: 2 (+8,000 & +7,500 recommended)
-
5-3
S-Rank condition: Kill 12 unit in 4 turns; control enemy HQ.
Required Squads: 2 (+8,500 & +7,500 recommended)
Turn 1: Spawn 2 echelons on each spawn point, follow 1~4.Turn 2: Depending on how enemy units move, your HQ could be in threat of surround takeover. If that is the case, move along (6~8). If HQ is not in threat, move along Green arrow to take helipad in green box.
Turn 3~4: meet 12 kill requirement and take enemy HQ.
-
5-4
S-Rank condition: Kill 10 unit in 3 turns; control enemy HQ.
Required Squads: 2 (+8,500 & +7,500 recommended) + 1 Dummy Echelon
-
5-5 (Read all comments before following along!)
S-Rank condition: Kill 14 unit in 6 turns; control enemy HQ.
Required Squads: 2 (+9,000 & +8,000 recommended) + 1 Friend Echelon
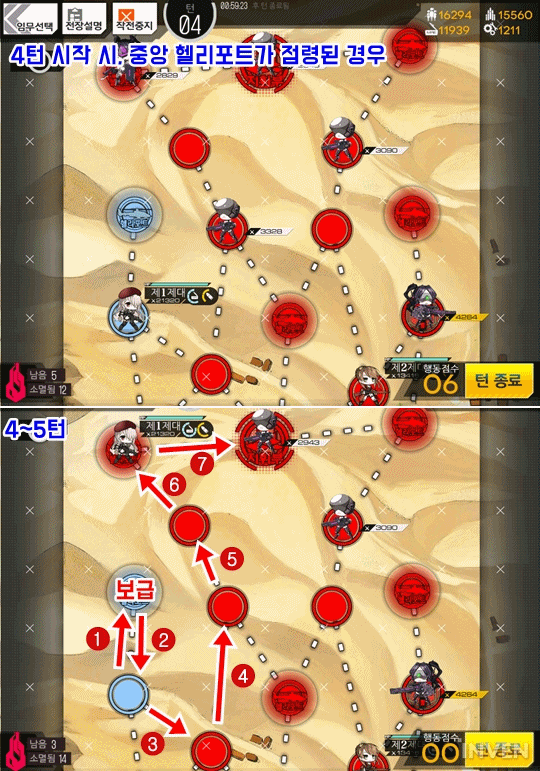
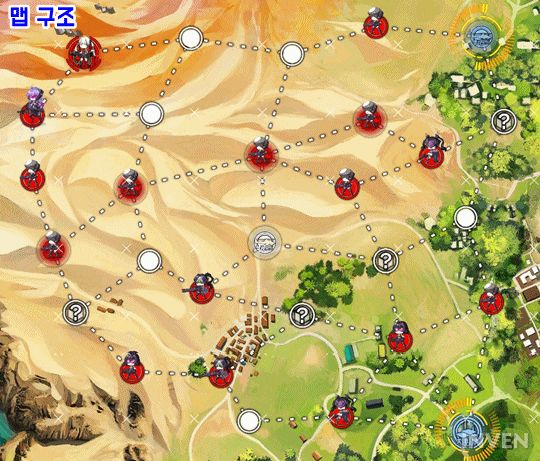
This one has two potential scenario at turn 4. I will cover first one above and 2nd one on photo below. Start by spawning 2 echelon on HQ and helipad on the left.Turn 1: Move HQ echelon up 2 to take helipad (1~2). Move 2nd echelon echelon one from helipad, spawn Friend Echelon (4) and set it to HQ. Swap 2nd Echelon with Friend Echelon to resupply, swap back, and move it up one (6).
Turn 2: Use 2nd Echelon to take enemy/neutral helipad on the middle of the map.
Turn 3: Resupply and use 2nd echelon on center helipad to surround occupy helipad on the left. Don’t stand on top of helipad as you can’t take the helipad this way and you want extra enemy unit to spawn to run into your echelon (15-17).
Turn 4a (If center helipad is still under your control): Follow path listed above, make sure to resupply before taking the rest of the moves (21~24).
Turn 4b (If center helipad is taken by enemy unit): Reference picture on the bottom. utilize helipad on the left to resupply and take shortest route to enemy HQ. (1~7)
-
5-6
S-Rank condition: Kill 16 unit in 6 turns; control enemy HQ.
Required Squads: 2 (+10,000 & +9,000 recommended)
Emergency Difficulty
-
5-1E
S-Rank condition: Kill 10 unit in 4 turns; control enemy HQ.
Required Squads: 2 (+11,000 & +9,500 recommended)
Compared to the normal version of the map, this one is actually simpler in terms of path. Just follow the path shown above and manage HQ echelon’s health carefully since it will take on most of the killing.
-
5-2E
S-Rank condition: Kill 10 unit in 2 turns; control enemy HQ.
Required Squads: 2 (+10,000 & +9,000 recommended)
-
5-3E
S-Rank condition: Kill 12 unit in 4 turns; control enemy HQ.
Required Squads: 2 (+12,000 & +11,000 recommended) + 1 Dummy Echelon
Picture seems bit small here, try to open it on new tab and view it on original size if you have difficulty viewing.Start with main Echelon on Helipad and 2nd Echelon on HQ.
Turn 1: Move main Echelon up 2. Spawn dummy Echelon on helipad, then move up one.
Turn 2: Main Echelon continues to move up to surround take center-left helipad (5~8).
Turn 3: Resupply and move main Echelon up towards enemy HQ. (10~13). Then move 2nd Echelon up one to take enemy helipad near our HQ.
Turn 4: 2nd Echelon moves to kill 2 units near friendly HQ (direction can be different on picture above compared to your situation. adopt accordingly). Then move main Echelon to take enemy HQ.
-
5-4E
S-Rank condition: Kill 14 unit in 5 turns; control enemy HQ.
Required Squads: 2 (+13,000 & +12,000 recommended) + 1 Friend Echelon + 1 Dummy
One bad thing about 5-4e? Destroyer learned her lesson… Fortunately we are still not going to fight her. This is very similar to to 5-6 but some minor changes are shown.Start: Start main echelon on HQ and 2nd Echelon on helipad on top.
Turn 1: 2nd Echelon takes helipad on the center (1~3). Then place dummy Echelon on helipad.
Turn 2: HQ defense echelon goes in circle to kill enemy units (5~9). Then 2nd echelon moves 1 to left to take helipad.
Turn 3: Move 2nd Echelon right up to enemy HQ (14~16). spawn Friend Echelon on center-left helipad and set it to HQ. HQ defending echelon continues to sweep the map on the bottom while resupplying (11~13).
Turn 4: Swap with Friend Echelon and go to other side to other side of the enemy HQ to finish surround. Then set Friend Echelon to “Wait”. HQ Echelon takes out any threat to friendly HQ with remaining turn.


